Pushing the Limits of Flawless Fastener Manufacturing

The following is a press release provided to GlobalFastenerNews.com. Contact the individual company for additional information.
In an engine, seven types of screws out of approximately 70 are considered critical, that are crucial to achieving the engine’s specified design performance: bolts for the cylinder head, crankshaft, con rod, flywheel, and main bearing cap, as well as for the camshaft cap, camshaft sprocket and VCT.
Having developed specialized engine expertise over three generations, the Italian fastener company Brugola OEB Industriale S.p.A. has focused on manufacturing these critical bolts, which are essential to assembling an engine’s vital components. These bolts must perfectly combine with vital engine components to ensure the performance and dynamic structural integrity of the engine despite high vibration and heat.
 When Brugola recently opened its first factory in the U.S., the company sought to expand into the U.S. market as well as enhance the precision of its critical engine bolts by pushing the limits of flawless manufacturing.
While the company retains automotive customers such as BMW, Bugatti, and Aston Martin in Europe, its third-generation President, Jody Brugola, recognized the importance of implementing state-of-the-art 3D laser gauging and axial vision inspection equipment to ensure ultra-precise fastener dimensional accuracy and eliminate all defects.
So before the company opened its Plymouth, Michigan plant, one of its key investments in guaranteeing the quality of its critical engine bolts was to select an advanced, sophisticated gauging system.
“Once our president saw 3D laser gauging, he knew it would be a critical part of our quality control process to achieve zero defects,” says Antonino Occhionero, Plant Manager at Brugola’s Plymouth, Michigan plant. “Our philosophy has always been to assure that all fastener dimensions are 100% accurate. He recognized laser gauging as a superior method to ensure such quality.”
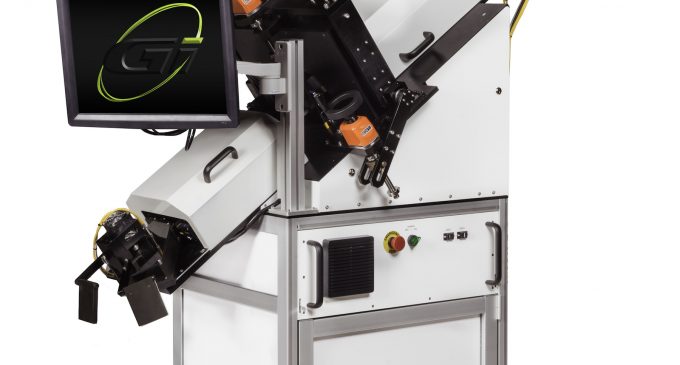
In order to make certain that all of its fasteners were flawless, Brugola turned to a high-speed 360-degree laser gauging device. The machine uses eight sensors and real-time part velocity calculation to essentially create a 3D profile of each part, along with measurement of a wide range of user-defined features to determine if each part meets exact dimensional requirements.
“Measuring 360 degrees around each part is critical,” explains Chris Alexander, a Product Manager at General Inspection, a developer of high-speed measuring and sorting fastener inspection systems. “Defects can be located anywhere so inspection needs to take place over 360 degrees. “You have to measure all the way around or you are missing defects. The device measures 360 degrees around each part to detect any small thread damage that may only be on a small portion of the shaft.”
The device Brugola selected for its critical fasteners, called the GI-360, measures a number of crucial fastener features such as head and shaft diameter, lengths, straightness, concentricity, thread angle and diameter (including major, minor and pitch diameter). It also detects any damaged threads, along with cracks on the bolt head and flange.
To meet the rigorous demands required for flawless dimensional precision, Brugola turned to a leading gauging equipment manufacturer, General Inspection, to develop a number of novel inspection features.
“When you have a hexagonal bolt, you have crucial dimensions from a flat to the opposite flat on each of the six sides,” explains Alexander. “It is also crucial to measure across corner dimensions as well.”
“Brugola Italy and Brugola USA worked with General Inspection to advance the capabilities of the laser gauging inspection equipment,” adds Occhionero. “The equipment is looking at lot of things at one time. We look at all the dimensions you can think of on the screw, all the dimensions required by the customer for a critical fastener.”
When the fastener inspection system manufacturer worked to improve the accuracy of dimensional measurements, the result was a redesigned version of the device, the GI-360T, which includes a tilt and lift feature for the laser head. This ensures the lasers are perpendicular to the part and corrects for the cosine error of headed parts, providing improved measurement readings for diameter (.005mm) and length (.01mm), total error.
With Brugola’s dedication to zero defect manufacturing of its critical engine fasteners, the company sought to further enhance the fastener inspection system. As an option on its high-speed fastener inspection system, Brugola selected an axial viewer lens system for 360-degree head crack detection.
In support of the Brugola’s goals, General Inspection improved crack detection in order to detect cracks, scratches, or missing features on the side flange of bolts. This specialty lens ‘sees’ around the head of the part.
“A standard lens cannot see a crack on the side of a bolt flange, so we developed a special lens that visually flattens out the flange to detect any cracks,” explains Alexander. “With a standard lens and camera, you can only see one side of a game die when viewed from above. With the specialized lens, you can see five sides of the die.”
Along with the wider viewing angle lens, the fastener inspection system manufacturer developed sophisticated image analysis software that minimizes surface and lighting variations. A strobe LED ring light also improves illumination of each part head for a better image.
“A standard light only generates so many lumens, so we used a strobe controller to overdrive the light for more light output,” says Alexander. “As each part triggers the sensor, the flash goes off at the moment the image is taken for better feature illumination.”
“We can sleep well at night because we know the 3D laser gauging, axial vision, and eddy current inspection equipment is helping to ensure flawless fastener manufacturing,” says Occhionero.
Occhionero adds the Brugola brand is becoming more recognizable internationally due in part to its exhaustive pursuit of quality and its eye for detail.
For more info, call 248-625-0529; Fax 248-625-0789; visit www.generalinspection.com; or write to General Inspection, 10585 Enterprise Dr., Davisburg, MI 48350.


There are no comments at the moment, do you want to add one?
Write a comment